Showing posts with label bags. Show all posts

Saturday, 9 April 2011

Drawstring tote bag: a tutorial


I made these little linen drawstring tote bags as gifts for Mother's Day (which was last weekend over here), for my grandmother, mother and mother-in-law. They're a good size to hold knitting, scarves, or slippers, or just to contain other gifts and cards.

The main difference between these bags and an ordinary drawstring bag is the openings above the side seams. They allow each side panel to gather nicely into a tote-style handle, and also leave room to access the contents of the bag easily.
Unlined bags like these would normally be made with french seams, but I couldn't figure out how to make that work with this variation, so I used a "clean finish" method to seal away the raw edges. The finished size for the bags I made here is approx 15" tall by 13" wide.

Drawstring tote bag

Materials
1 piece linen or home-decor weight cotton, 34" x 14", for the bag.
2 strips of patterned cotton 22" x 2" and 2 strips of main bag material 22" x 2" for the handles. Or, for thinner handles, use two 22" x 3 strips of patterned fabric and use the press and fold method to make straps from a single piece, or just use two 22" pieces of 3/4" ribbon or tape for a super-quick version.

Instructions
Step 1: Sew the side seams
Fold the main bag piece in half width-wise, (right sides together if you're using patterned fabric), and pin both sides. Measure 5" down from the open end and mark each side.
Sew the sides seams with a 1/2" seam allowance, stopping/ending at your mark, remembering to backstitch at the ends.
Step 2: Fold clean finish seams
To begin the clean finish seams, press your side seams open, continuing into the 5" of unsewn seam to form a hem.
Then fold again a further 1/4" so the raw edge is tucked against the sewn seam (forming a double hem in the 5" portion at the top) and press again. Normally I find this kind of thing fiddly but the lovely crisp linen was easy to work with and I didn't bother pinning it. 
Fold down 1/2" at each top edge to the wrong side of the bag and press, overlapping your clean finish seams. Pin the hem in place.
Step 3: Sew top hem and clean finish seams
Starting about 1" up from a bottom corner of the bag, begin to sew one of the clean finish seams, sewing through the double fold of the seam and the single layer of the bag. It's a little tricky to get the bag positioned correctly. Go slowly and ease it in gently so it isn't twisted. You won't be able to start right at the corner, but it doesn't matter because the corners will be squared off later.
Continue along the open portion, sewing the double hem up to the top of the bag at about 1/8 ".
Turn and sew across the top of the bag with a 1/4" allowance. Continue on, all the way around the bag, sewing up and down the other side, along the top and back down the other side.

Phew! That's the awkward bit done! Don't those seams look lovely and neat?
Step 4: Make the handle casing
Fold down each top edge a further 1 1/4" to the wrong sides to form the drawstring channels. Press. After many hours of hemming curtains I use a piece of cardboard marked with the hem allowance to get the fold in the right place.
Sew each top along the line of your previous hem to make a 1" channel.

Step 5: Square the corners
Fold the bag so the side seams lie at the centre. Mark a line about 1" down from the corner, where the width of the bag is 2 1/2". Pin and repeat for the other corner.
 Sew along the marked line, then zig-zag next to it.
 Trim off the corner.
Step 6: Embellish!
I used one of El's drawings printed on to transfer paper and ironed it directly on to the bag. (Make sure your transfer paper is suitable for linen!) I added a little label to the other side using the same method.

Step 7: Make and thread the handles
To make handles like these, take 1 strip of patterned cotton and 1 strip of bag material and pin, right sides together. Sew with a 1/4" allowance. Use a safety pin to turn inside out and press, tucking in the ends. Topstitch close to the edge all the way around.


Thread each handle through a channel. (Fold in half to fit through the channel if you've made wide handles). I used a knitting needle and safety pin to make this bearably quick.

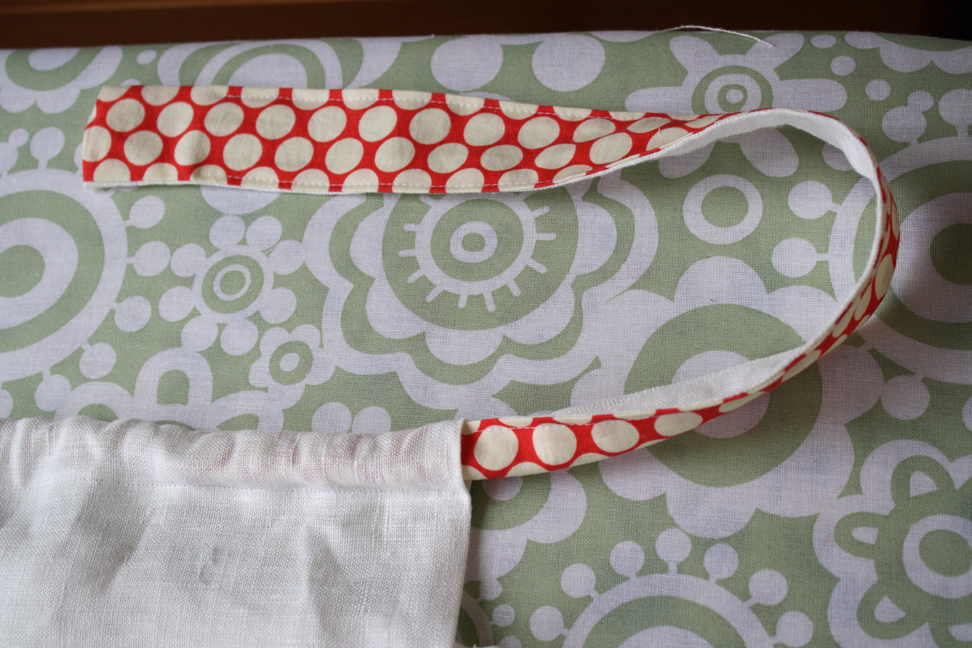


Overlaps the handle ends 1” and sew together (making sure it’s not twisted!), then shift the straps around until the overlapped ends sit within the channels. Pull the handles to gather the fabric as required.

Sit back and admire the finished product!


(Personal use only - please do not sell bags made from this tutorial.)

Monday, 3 January 2011

A few more firsts from 2010...

My first ever messenger bag using a fantastic tutorial at mmmcrafts. The lovely colourful fabric is Frederika from Ikea. We added a few cute buttons El chose from Purlesque in Liverpool.
I also made my first ever dress for Kiki using the Sweet Little Dress pattern by Leila & Ben, and added a dinosaur applique.


And I made a couple of prototype dolls based on patterns I drew up myself. Angelica (who still needs a proper blouse, since my attention span didn't last quite long enough):

And Anna Rose, who is sweet despite being literally two-faced (her hair is a little felt pocket that flips over):

Friday, 8 October 2010

Oilcloth tote

It is the season of rain, rain and more rain, and so last week I found myself in need of a waterproof bag for library books and the usual assorted overflow from the baby bag. I picked up this nice Boden-esque spotty oilcloth last weekend and had a go at making a) my first ever tote and b) my first ever anything made from oilcloth. After reading a few tutorials on sewing oilcloth I was expecting it to be difficult, but the body of the bag was absolutely fine. The straps were much tougher because the fabric just didn't seem to want to go through the machine.

I wanted my bag to be unlined but I didn't fancy sewing though 8 layers of oilcloth to finish the ends of the straps, so I copied another bag and made an interior border, attached like a lining and then topstitched 3/4" further down to secure. This was the trickiest bit as it just wouldn't lie straight whilst sewing, so the results aren't as neat as I would have liked.

But still, it's all useful stuff to learn, and next time I'll make sure I have masking tape to put on my presser foot as that's supposed to help.

And of course there was glorious sunshine today so I didn't really need my waterproof bag at all!
Related Posts Plugin for WordPress, Blogger...