Friday, 15 April 2011

Photo Friday: Hello Spring!

We've had some glorious spring weather here recently, and have been welcoming with open arms the opportunity to get outside.
Of course the logistics of actually getting outside aren't necessarily any easier, because that blue sky means sunblock and sunhats in addition to all the normal spring gear of wellies and woolies.
But once out, there's a lot to see. And very, very many questions to be answered.

Which makes, for, at the end of the day, an evidently too-tired-to-hold-the-camera-straight-or-focus-properly mother, but two pretty-much happy-with-life children.

(Butterflies and turtles on view at Williamson Park, Lancaster.)

Sunday, 10 April 2011

Word treasure hunt

Here's another little activity that has worked well recently. El has been doing phonics at pre-school but is not in the slightest bit interested in learning to read when there are far more interesting things to do, like playing pirates or mermaids or princesses. We've done variations on the idea of a treasure hunt before, with pictures or clues that an adult could read and she's always enjoyed them, but the other idea I thought it was worth trying her with simple word clues to read for herself.

Using little post-it notes, I wrote down as many places in the house as I could think of with phonics-friendly names and stuck them to a piece of card. I tried to get a mixture of simple and harder words, and some with repeated words ("back door", "door mat"). On the last note I wrote "Treasure" and of course an "x", to mark the spot.

The treasure box is a small tin containing a little bit of chocolate wrapped in foil and a Lego pirate guardian. (I've since set this game up without chocolate - just got her to choose one of her toys as treasure - but the promise of chocolate treasure got her interested the first time).

Then I set up the clue in a trail around the house, each clue giving the location of the next. I stuck the card to the fridge and got her to put the clues back up on the card once she'd read them.

I wasn't sure how well she would get on with reading, and I did help her a little, but she did much better than I expected, and was so much more excited about following a trail of clues to the treasure than she ever is about the prospect of reading a book for herself.

And the best thing about this activity was that, like everything she enjoys, she wanted to do it over and over again, and after only a few times she was reading most of the words rather than sounding them out.

And of course her sister wanted in on it too. Which meant i could clear up or make dinner without having to turn on the TV.

I think I'll do an Easter egg version of it next week, make them work for that chocolate! :)

Saturday, 9 April 2011

Drawstring tote bag: a tutorial


I made these little linen drawstring tote bags as gifts for Mother's Day (which was last weekend over here), for my grandmother, mother and mother-in-law. They're a good size to hold knitting, scarves, or slippers, or just to contain other gifts and cards.

The main difference between these bags and an ordinary drawstring bag is the openings above the side seams. They allow each side panel to gather nicely into a tote-style handle, and also leave room to access the contents of the bag easily.
Unlined bags like these would normally be made with french seams, but I couldn't figure out how to make that work with this variation, so I used a "clean finish" method to seal away the raw edges. The finished size for the bags I made here is approx 15" tall by 13" wide.

Drawstring tote bag

Materials
1 piece linen or home-decor weight cotton, 34" x 14", for the bag.
2 strips of patterned cotton 22" x 2" and 2 strips of main bag material 22" x 2" for the handles. Or, for thinner handles, use two 22" x 3 strips of patterned fabric and use the press and fold method to make straps from a single piece, or just use two 22" pieces of 3/4" ribbon or tape for a super-quick version.

Instructions
Step 1: Sew the side seams
Fold the main bag piece in half width-wise, (right sides together if you're using patterned fabric), and pin both sides. Measure 5" down from the open end and mark each side.
Sew the sides seams with a 1/2" seam allowance, stopping/ending at your mark, remembering to backstitch at the ends.
Step 2: Fold clean finish seams
To begin the clean finish seams, press your side seams open, continuing into the 5" of unsewn seam to form a hem.
Then fold again a further 1/4" so the raw edge is tucked against the sewn seam (forming a double hem in the 5" portion at the top) and press again. Normally I find this kind of thing fiddly but the lovely crisp linen was easy to work with and I didn't bother pinning it. 
Fold down 1/2" at each top edge to the wrong side of the bag and press, overlapping your clean finish seams. Pin the hem in place.
Step 3: Sew top hem and clean finish seams
Starting about 1" up from a bottom corner of the bag, begin to sew one of the clean finish seams, sewing through the double fold of the seam and the single layer of the bag. It's a little tricky to get the bag positioned correctly. Go slowly and ease it in gently so it isn't twisted. You won't be able to start right at the corner, but it doesn't matter because the corners will be squared off later.
Continue along the open portion, sewing the double hem up to the top of the bag at about 1/8 ".
Turn and sew across the top of the bag with a 1/4" allowance. Continue on, all the way around the bag, sewing up and down the other side, along the top and back down the other side.

Phew! That's the awkward bit done! Don't those seams look lovely and neat?
Step 4: Make the handle casing
Fold down each top edge a further 1 1/4" to the wrong sides to form the drawstring channels. Press. After many hours of hemming curtains I use a piece of cardboard marked with the hem allowance to get the fold in the right place.
Sew each top along the line of your previous hem to make a 1" channel.

Step 5: Square the corners
Fold the bag so the side seams lie at the centre. Mark a line about 1" down from the corner, where the width of the bag is 2 1/2". Pin and repeat for the other corner.
 Sew along the marked line, then zig-zag next to it.
 Trim off the corner.
Step 6: Embellish!
I used one of El's drawings printed on to transfer paper and ironed it directly on to the bag. (Make sure your transfer paper is suitable for linen!) I added a little label to the other side using the same method.

Step 7: Make and thread the handles
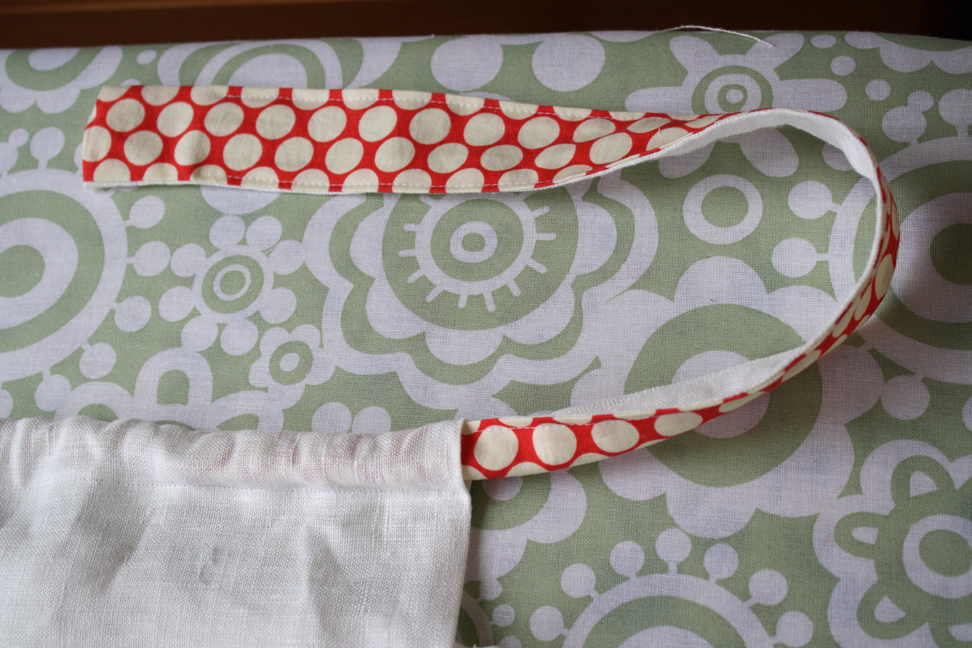
To make handles like these, take 1 strip of patterned cotton and 1 strip of bag material and pin, right sides together. Sew with a 1/4" allowance. Use a safety pin to turn inside out and press, tucking in the ends. Topstitch close to the edge all the way around.


Thread each handle through a channel. (Fold in half to fit through the channel if you've made wide handles). I used a knitting needle and safety pin to make this bearably quick.


Overlaps the handle ends 1” and sew together (making sure it’s not twisted!), then shift the straps around until the overlapped ends sit within the channels. Pull the handles to gather the fabric as required.

Sit back and admire the finished product!


(Personal use only - please do not sell bags made from this tutorial.)

Sunday, 3 April 2011

Funny faces

I just thought I'd share this little art activity my 4-year-old has enjoyed recently. I usually leave her to it when it comes to art as she's quite happy with paper and pencils and crayons, and always has strong opinions about exactly what she wants to do and how she's going to do it. But the other day we were talking about emotions and how to draw them, and I thought of this.

To get her started, I drew 6 ovals on a piece of paper, and added very simple eyes and a nose to each.


Then I gave her the bathroom mirror and asked her to try an expression (angry was a good one) and look at her mouth (open, closed, smiling, straight etc.) and eyebrows (low, high, curved, straight, sloping, etc). After we'd talked a little about what they looked like, I left her to have a go at drawing them.


Cue one happy, occupied child and one highly entertained mother!


She was really pleased with the drawings she produced.

Wednesday, 23 March 2011

Happy Spring!


I've been meaning to make blouses/tunics for the girls in quilting fabric ever since last summer, and finally got around to it this past week. I used the Leila & Ben Sweet Little Dress pattern, cut a little shorter. Ki's dress has sleeves made from recycled t-shirt fabric for comfort, since the elastication of the neck and sleeves seems to roughen even the softest woven cotton. I added elastic at the front of each bodice to give a bit of an empire waist and a nice flair to the skirt.


The bottom part of El's blouse is pale blue linen, and I particularly like that colour combined with those of the Amy Butler print - they're the colours of dawn on the sunny spring days that we've been experiencing, and delighting in.


(With the obligatory accompanying creases, tangled hair and saggy leggings! Mini Boden we are not.)

Wednesday, 9 March 2011

Crayon rolls


This might be my favourite sewing project to date. It ticks all the boxes: quick to make, relatively straightforward to sew (so long as you don't get distracted by the radio and sew forget to leave yourself a gap to turn the thing the right way out - but I wouldn't be silly enough to do that, would I? :D ). The results are both pretty and extremely practical. Especially for Ki, who spends as much time playing with the crayons as drawing with them.

Don't they look sweet wrapped up like that? Tutorials for making these are all over the place. I followed instructions here, and took inspiration from the felt pencil roll in this book.

I think I might need to make another one for my stash of beloved Karisma pencils. I only found out the other day that they are no longer made, which is so sad because they are by far the best colour pencils I've ever come across for pigment intensity and blendability. As Miss E said, "look Mama, the yellow isn't invisible!"

Thursday, 3 March 2011

Photo Friday/This Moment

A little early this week, to make up for the missing last week.

Inspired by Soulemama's {this moment}, and doubly-inspired, in fact, since Ki's little pullover was my first knitting project in a very long time. The pattern is the "toddler-t-shirt-vest" by Sam Lamb, free from Ravelry here.


We're enjoying our quiet morning drawing time at the table, especially on a sunny morning, and when our room is filled with the scent of these:

Related Posts Plugin for WordPress, Blogger...