Friday 29 April 2011

The final shirt (and another!)


In the end I wasn't too happy with just the stencilled Union flag for El's shirt, so I made another print with a further stencil of three hearts and a crown (which I drew by hand) on top. I appliqued the final design to a white t-shirt , added some off-cuts of knit fabric as bunting around the shoulders, and she was ready to go.

I loved the look of the bunting so much, I decided to make a shirt for Kiki too, using an old white hand-me-down t-shirt that was getting a little short on her. I added a couple of ruffles at the bottom and a string of bunting made from more offcuts and some ribbon.
I didn't have interfacing to iron on to the back of the triangles to stop them curling up so I had to sew them in place. I think I might make more in other colour combinations as I have a lot of fabric scraps and old t-shirts to use up!

As for the wedding itself, I loved Kate's dress, and those trees in the Abbey. The girls were not terribly impressed (neither of them are really the princess type, except for princesses who fight baddies and fly on spaceships). But they did approve of the mini Victoria sponge cakes and strawberries we had at tea time. And Daddy's home made bread.


Wednesday 27 April 2011

Union Jack freezer paper stencil

Hope everyone had a relaxing Easter break! This is just a fly-by post to share a freezer paper stencil for a Union Jack flag (yes I know, pedants, strictly it's just called the Union flag). I'm in the process of making El a shirt for her Royal Wedding celebration day at pre-school tomorrow and I thought I'd share this now when it might actually be of use!

Here's the finished image.


This is the first time I've attempted freezer paper stenciling and I love it! Freezer paper isn't too widely available here in the UK, but you can get it from Hobbycraft. I got mine from Ebay. There are very many tutorials out there on the technique of freezer paper stenciling - for example here and here.

For this flag you need two colours and hence two stencils - one for the red and one for the blue (for use on white fabric). I've made the two part stencil into a pdf which you can grab here:

Click here to download from mediafire
Or here on Scribd

Just print out on to freezer paper (non waxy side), cut into two halves, then cut out the black parts using a craft knife and ruler.

(The pdf should print out OK on both US and UK paper sizes; just make sure you are not scaling to fit the paper).

Iron the "blue" part onto your fabric first, then sponge on your blue fabric paint. When it's completely dry (ours dried after a couple of hours in the sunshine), remove the paper and iron on the "red" part of the stencil, using the little grey markers to line up the cross correctly with the blue parts you've already printed. Then paint on your red fabric paint.


So easy! Miss El did this part herself.

Wait again, then peel and reveal!


As you can see I was rushing and got the positioning just off slightly so that some of the thinnest stripe at the bottom right is a little messed up. But imperfections are the beauty of handmade right? :)

I used scrap fabric so I can temporarily applique it to a shirt for tomorrow, but you can apply straight to a tshirt, of course.

Off to finish the shirt now!

ETA: click to see how it turned out.

Monday 18 April 2011

The You and Me mat: a tutorial

One of the things I love about being able to operate a sewing machine is that often, when I think 'you know, right now something like x,y,z would be useful...' I don't have to go and scour the shops/internet to find it -  I can just go home and have a bash at making it myself, and even save a bit of money in the process.

I'm trying to be outdoors with the girls as much as possible at the moment, and snack stops on wet spring grass mean they need something to sit on. Our big picnic blanket is far too big to stuff into my bag (already overloaded with changing things, snacks, drinks, sunblock, etc etc). We have a few play mats that are about the right size but they would just end up soggy.

What we really, really needed something exactly like this:

It's lightweight. It's comfortable. It's a mini picnic quilt that's perfect for two. It's backed by waterproof polyester, and if it does get dirty, it's machine washable. It's the You and Me mat, and here's how I made it.

Materials
  • Sewing machine with walking foot installed.
  • Disappearing fabric pen.
  • Hair grips (the metal sort with one wavy edge and one straight edge; we call them bobby pins).
  • A piece of lightweight cotton for the top, sized 1/2" bigger all round than the desired mat size. I used a 37" x 27" piece of this "Gullan" cotton from Ikea featuring an appropiate food-splodged print, and I pre-washed and dried it.
  • A piece of lightweight cotton for the ties (40" x 4" for the size of mat I made, I used a leftover bit from cutting the top piece).
  • A piece of quilt batting cut approx 1/2" - 1" larger all round than the cotton top piece. ( I used Sew Simple 80/20 cotton blend)
  • A piece of lightweight ripstop polyester, sized 4" bigger all round than the desired mat size. (The fabric I used was 130grams/square metre).

Instructions

1. Sew the quilted top
Place the cotton top piece on top of the batting and pin all round. With the walking foot installed, stitch around the edges with a 1/2" allowance (from the edge of the cotton top piece). Then, using a disappearing fabric pen, mark lines at equal intervals along the length. I used a 3" interval. Pin in the spaces between your lines to stop the layers from shifting, then machine stitch along the lines.
(Here's the top quilted at a 6" spacing. I then went back and added another set of lines to make the spacing 3").

Trim neatly around the quilted top, cutting through both layers to an allowance of 1/4" (from the stitched border), thereby making the top the size of the finished mat.

2. Attach the backing.
Place the piece of ripstop polyester on a flat surface, wrong size up (on my piece one side was slightly shinier than the other). Place the quilted top centrally on top, so 2" of the backing is visible all around.

You can't iron the polyester because it will melt, and you can't pin it either because any holes made will be permanent. So you have to fold and press the backing over the quilted top by hand, and secure with something that doesn't puncture the fabric. I used hair grips.

Fold over each edge by 1" to meet the edge of the quilted top, and then 1" again to overlap the top. At the corners, fold each corner of the polyester in underneath the corner of the quilted top to make a neat corner in the binding. Hold in place with the hair grips.


(You can also fold the corners like this). Continue all the way around.

3. Machine stitch the backing to the quilt top.
Large machine needles can rip big holes in the polyester fabric, so you now need to switch to a thin needle. I used a size 9, which didn't seem to be a problem with this thin cotton fabric and fairly lightweight wadding.

Still with the walking foot installed, sew around the top of the quilt, 1/4" from the inside edge of the binding.
I found this wasn't enough to secure the folded corners, so I pulled them to overlap a little and stitched close to the join.
To finish off and hold in place, edgestitch a second row of stitches on the binding close to the join with the quilt top.

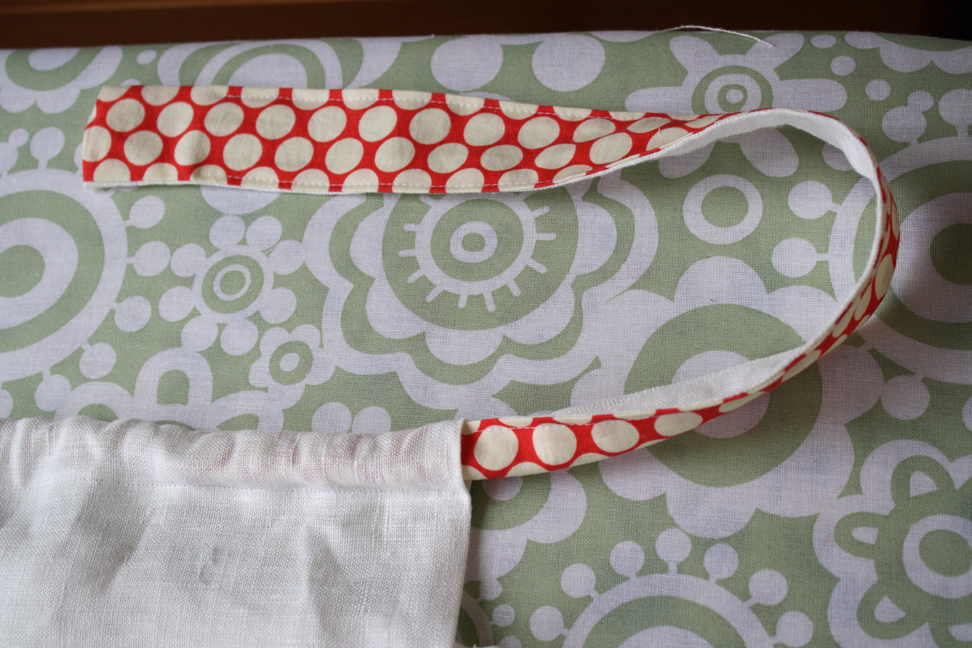
4. Make and attach the ties
To make the ties, Take a 40"x4" strip of fabric and fold in half to make a 40" by 2" strip. Press, then open up and fold each long edge toward the crease. Press again, tucking in 1/2" at each short end, then fold in half so the folded edges are together, making a 40" by 1" strip. Press and pin in place, then machine stitch 1/8" from the edges to hold it all together.

Place the tie on the reverse of the mat, on one of the long sides, 1/8 of the long edge length (about 4 1/2 ") from the corner, with the middle of the tie positioned over the mat's stitch lines. Sew in place by following the two existing stitch lines. (With the mat unfolded, obviously.)

Roll the finished mat up by folding along the long edge, then folding again, then rolling towards the ties.

All ready to take out on expedition!

Just to the back garden... 


Or further afield. (A field).

 Washing tip: a 40 degree wash on a gentle spin cycle seemed fine, but probably best not to tumble dry.

Happy sewing!

(Personal use only - please do not sell items made from this tutorial, thanks)

Friday 15 April 2011

Photo Friday: Hello Spring!

We've had some glorious spring weather here recently, and have been welcoming with open arms the opportunity to get outside.
Of course the logistics of actually getting outside aren't necessarily any easier, because that blue sky means sunblock and sunhats in addition to all the normal spring gear of wellies and woolies.
But once out, there's a lot to see. And very, very many questions to be answered.

Which makes, for, at the end of the day, an evidently too-tired-to-hold-the-camera-straight-or-focus-properly mother, but two pretty-much happy-with-life children.

(Butterflies and turtles on view at Williamson Park, Lancaster.)

Sunday 10 April 2011

Word treasure hunt

Here's another little activity that has worked well recently. El has been doing phonics at pre-school but is not in the slightest bit interested in learning to read when there are far more interesting things to do, like playing pirates or mermaids or princesses. We've done variations on the idea of a treasure hunt before, with pictures or clues that an adult could read and she's always enjoyed them, but the other idea I thought it was worth trying her with simple word clues to read for herself.

Using little post-it notes, I wrote down as many places in the house as I could think of with phonics-friendly names and stuck them to a piece of card. I tried to get a mixture of simple and harder words, and some with repeated words ("back door", "door mat"). On the last note I wrote "Treasure" and of course an "x", to mark the spot.

The treasure box is a small tin containing a little bit of chocolate wrapped in foil and a Lego pirate guardian. (I've since set this game up without chocolate - just got her to choose one of her toys as treasure - but the promise of chocolate treasure got her interested the first time).

Then I set up the clue in a trail around the house, each clue giving the location of the next. I stuck the card to the fridge and got her to put the clues back up on the card once she'd read them.

I wasn't sure how well she would get on with reading, and I did help her a little, but she did much better than I expected, and was so much more excited about following a trail of clues to the treasure than she ever is about the prospect of reading a book for herself.

And the best thing about this activity was that, like everything she enjoys, she wanted to do it over and over again, and after only a few times she was reading most of the words rather than sounding them out.

And of course her sister wanted in on it too. Which meant i could clear up or make dinner without having to turn on the TV.

I think I'll do an Easter egg version of it next week, make them work for that chocolate! :)

Saturday 9 April 2011

Drawstring tote bag: a tutorial


I made these little linen drawstring tote bags as gifts for Mother's Day (which was last weekend over here), for my grandmother, mother and mother-in-law. They're a good size to hold knitting, scarves, or slippers, or just to contain other gifts and cards.

The main difference between these bags and an ordinary drawstring bag is the openings above the side seams. They allow each side panel to gather nicely into a tote-style handle, and also leave room to access the contents of the bag easily.
Unlined bags like these would normally be made with french seams, but I couldn't figure out how to make that work with this variation, so I used a "clean finish" method to seal away the raw edges. The finished size for the bags I made here is approx 15" tall by 13" wide.

Drawstring tote bag

Materials
1 piece linen or home-decor weight cotton, 34" x 14", for the bag.
2 strips of patterned cotton 22" x 2" and 2 strips of main bag material 22" x 2" for the handles. Or, for thinner handles, use two 22" x 3 strips of patterned fabric and use the press and fold method to make straps from a single piece, or just use two 22" pieces of 3/4" ribbon or tape for a super-quick version.

Instructions
Step 1: Sew the side seams
Fold the main bag piece in half width-wise, (right sides together if you're using patterned fabric), and pin both sides. Measure 5" down from the open end and mark each side.
Sew the sides seams with a 1/2" seam allowance, stopping/ending at your mark, remembering to backstitch at the ends.
Step 2: Fold clean finish seams
To begin the clean finish seams, press your side seams open, continuing into the 5" of unsewn seam to form a hem.
Then fold again a further 1/4" so the raw edge is tucked against the sewn seam (forming a double hem in the 5" portion at the top) and press again. Normally I find this kind of thing fiddly but the lovely crisp linen was easy to work with and I didn't bother pinning it. 
Fold down 1/2" at each top edge to the wrong side of the bag and press, overlapping your clean finish seams. Pin the hem in place.
Step 3: Sew top hem and clean finish seams
Starting about 1" up from a bottom corner of the bag, begin to sew one of the clean finish seams, sewing through the double fold of the seam and the single layer of the bag. It's a little tricky to get the bag positioned correctly. Go slowly and ease it in gently so it isn't twisted. You won't be able to start right at the corner, but it doesn't matter because the corners will be squared off later.
Continue along the open portion, sewing the double hem up to the top of the bag at about 1/8 ".
Turn and sew across the top of the bag with a 1/4" allowance. Continue on, all the way around the bag, sewing up and down the other side, along the top and back down the other side.

Phew! That's the awkward bit done! Don't those seams look lovely and neat?
Step 4: Make the handle casing
Fold down each top edge a further 1 1/4" to the wrong sides to form the drawstring channels. Press. After many hours of hemming curtains I use a piece of cardboard marked with the hem allowance to get the fold in the right place.
Sew each top along the line of your previous hem to make a 1" channel.

Step 5: Square the corners
Fold the bag so the side seams lie at the centre. Mark a line about 1" down from the corner, where the width of the bag is 2 1/2". Pin and repeat for the other corner.
 Sew along the marked line, then zig-zag next to it.
 Trim off the corner.
Step 6: Embellish!
I used one of El's drawings printed on to transfer paper and ironed it directly on to the bag. (Make sure your transfer paper is suitable for linen!) I added a little label to the other side using the same method.

Step 7: Make and thread the handles
To make handles like these, take 1 strip of patterned cotton and 1 strip of bag material and pin, right sides together. Sew with a 1/4" allowance. Use a safety pin to turn inside out and press, tucking in the ends. Topstitch close to the edge all the way around.


Thread each handle through a channel. (Fold in half to fit through the channel if you've made wide handles). I used a knitting needle and safety pin to make this bearably quick.


Overlaps the handle ends 1” and sew together (making sure it’s not twisted!), then shift the straps around until the overlapped ends sit within the channels. Pull the handles to gather the fabric as required.

Sit back and admire the finished product!


(Personal use only - please do not sell bags made from this tutorial.)
Related Posts Plugin for WordPress, Blogger...